Import Gmail messages into Google Keep as notes
A few weeks ago a friend asked me for a way to import his Apple Notes into Google Keep. It seems that no easy straighforward way exists as of today so I decided it was a great opportunity to make my first Chrome extension and create my own importer.
It turned out to be a bit more complicated than I expected though, hence no plugin already exists. The reason is that Google as of now does not provide an open API for developers to use in order to import messages which makes the whole project impossible from a programmatible point of view. In the end I managed to overcome this issue and created the extension which you can download from the Chrome store and try it yourself (direct link to Chrome Store).
In this tutorial I will first provide instructions how to use the extension for the impatient ones, and then I will go into more details regarding its implementation and the issues encountered during the process.
How to use the LP Gmail to Keep Importer
The most updated state and instructions about the plugin will always be accessible at its Github repository where you can also download the source code. Any feedback and pull-requests are welcomed.
The following instructions are valid and work with the Google Keep website as of the date of this article.
Install the plugin from the Chrome store: Download LP Gmail Keep Importer
In order for the plugin to work you have to, read again, have to be at the Google Keep website (reason explained below). Visit Google Keep and login with your account.
Once you are at the Keep website, and you have installed the extension you should be able to see the LP G2K icon in Chrome’s toolbar.
Click the extension’s icon in order to open the plugin and you should see a small window like the picture below.

The authorization is required only the first time you use the extension. You have to authorize it to access your emails (read only don’t worry).
- Click Authorize to be redirected to Google’s authorization page.
- Click Allow to allow the extension to use your account’s email.
- The window will stay open with a blank page. This behavior is a bug from Google’s side and they are looking into a fix, but for now just close the window yourself and refresh the page.
Click again the extension’s icon and now you should see the normal view with the text box (from now on this is what you should see since you already authorised it).
In the text box you have to type the Gmail label name you want to import. As you know Gmail organizes your mails, messages, in labels so just find out the label you want to import and type it here or create a new one if you don’t have one. Apple Notes automatically saves your notes as emails under the label name Notes, so use that if you want to import your Apple notes.
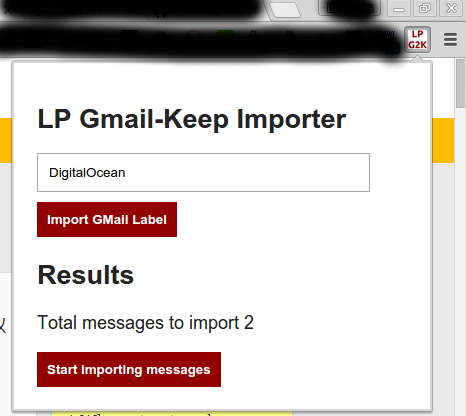
Click Import GMail Label. Once the plugin fetches your messages from Gmail, it will show you a small result view with the number of messages found (like the picture below) or it will show an error message if there was a problem during the fetching process.

Click Start Importing messages in order to start adding your messages as notes into Google Keep. If you have hundreds of messages please be patient and wait until you see a response, either an error or a success message.
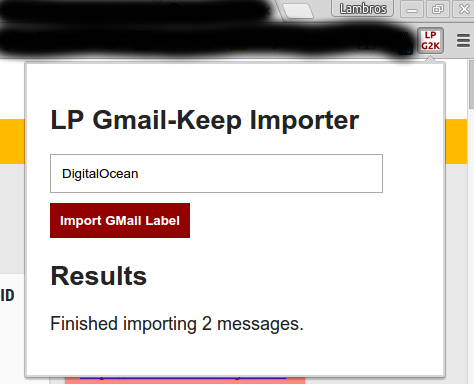
When your messages have been imported you will actually see them in the background to be inside your Keep notes but also you will see a confirmation like the following picture.

You have successfully imported your Gmail messages into Google Keep :)
If you encountered any problems or your experience was different from what I described please contact me in order to fix the issue. As you will read later, the extension is highly experimental and it might not be working as expected in all operating systems (I had some issues with Mac OSX but I tried to resolve them).
In addition, it goes without saying that the importer works for plain emails. If you try to import emails that have attachments or fancy HTML websites embedded only the visible text of the message will be imported. As of version v0.13 the first line of the email becomes the title of the note in Keep.
Deep dive into the juicy details
This section contains more details about the problem itself, its issues, and the approach that I used to solve it. If you discovered a better solution contact me or even better do a pull-request at Github with your solution and I will adjust it accordingly.
Problem overview
Initially the problem at hand was to import Apple Notes into Google Keep. Apple Notes stores your notes as messages at Gmail (assuming you use a Google account of course) under the label Notes (yes, very innovative name by Apple that will not conflict with anything :D ). This makes it easier for us since the problem now can be reduced to importing from Gmail to Google Keep, which seemed trivial at first glance. Therefore, our problem now is two-fold: a) Fetch messages from Gmail and b) Create a note in Google Keep with code programmatically.
Gmail has a very nicely explained and easy to use Javascript API so the first task of fetching the emails under a label name is trivial and I will not go into more details since there are hundreds of articles explaining how to do this. Personally, I find Google’s documentation to be superb.
The problem is with the second part, creating notes into Google Keep. Google does not provide an open API for Keep as it does with Gmail so far, maybe because it is a new (couple of years) service or just because they don’t want developers yet to create apps around it. As a web developer myself I instantly had an idea to overcome this problem. Let’s use the Keep website and use the existing form programmatically, thus typing the note, the title and clicking the Done button, all with code. Nifty idea right? :)
The journey inside Google Keep website
My first goal was to come up with a way to identify and reference the three major components we need:
- Title text box
- Content text box
- Done button (more problematic since the actual text might be different in each language)
Identification - Selectability
I dived into the HTML source code of the website, always using the awesome Chrome web developer tools, and I tried to detect something distinctive for each one of them. After trying several things the only solution that worked for me since I did not want to use actual text due to translations, is using CSS classnames. The only concern I had, have, and will have regarding this is that the classnames are not actual words so I guess Google uses some kind of builder to generate them, so at any moment in the future when Google modifies the Keep website there is a high probability that the classnames will change, thus breaking the plugin. Since I could not find any other identifiable characteristic I decided to go with it and in case this happens in the future I will just update the extension with the new names, until Google release a proper API.
Add note with code
So far so good, we have a way to reference each HTML element on the website. Let’s try to add some dummy content into the text boxes and simulate the click on the submit button to see what happens.
1. Adding text programmatically: Works
2. Clicking Done: Does not work!
Hmmm, this was not expected at first because the button was clicked, but nothing happened and the note disappeared instead of being added. After diving deeper into the code I was examing the HTML dom of the elements in question throughout a proper manual note creation and saw what changed, where the content was added in reality, and what was the button’s behavior. I discovered that Google uses two elements per input field instead of one in order to allow expandable text areas. Interesting I thought, so I did a little research and found this great article by A List Apart which explains in more details how this is done.
Attempt number two. Having seen the issue I know referenced the proper element for the input boxes when adding the text, the ones which are really used during the submission of the note. Let’s try again.
1. Adding text programmatically: Works
2. Clicking Done: Does NOT work!
OK! Google Keep vs Lambros, 2 - 0.
Something was going wrong right? I went over my code several times to make sure I was not being stupid, and strangely enough I wasn’t so the problem was somewhere else. I spent several hours investigating the problem and I had an idea. Maybe it was something special happening when the submit button was pressed in reality that I was missing by doing it with code. Again, Chrome developer tools to the rescue.
I discovered a great tool that allows you to inspect the fired HTML/Javascript events of the page and even put breakpoints in your code to the exact point when it happens. If you want to see this and test it:
- Open the developer tools in Chrome
- Click the Sources tab
- You can see on the right-hand side now a section named Event Listener Breakpoints
- Play with it :)
Fast-forward a few hours and I discovered that in order to have a successful note submitted the button when clicked does not only fire the click event, but it has to also fire the mousedown followed by the mouseup events, in this specific order. Additionally, the same has to happen with the input boxes. All the events I use as of now to make a proper submission are shown below.
- Input boxes (title, content)
- Add the text to the right element
- Fire events: change => mousedown => mouseup
- Submit button
- Fire events: mousedown => mouseup
The implementation source code of this logic and the whole note creation is in the chrome-logic-keep.js file at Github.
Attempt number three.
1. Adding text programmatically: Works
2. Clicking Done: Works
And voila! We can now add notes into Keep programmatically.
After this, I spent several hours figuring out how Chrome extensions work and went ahead and created my first extension. If you encounter any errors, please contact me or contribute to the project on Github. I have already said that it is a highly experimental project and it might break at any time if even the smallest detail changes on Google Keep’s website.
Google Keep vs Lambros, win for Lambros with KO!
As Jeff Bezos says, “It’s Still Day-One”
It was a very nice little project, and learned tons of new stuff. Web is amazing and ever-changing so we have to always keep learning.