Create a contact form using Amazon Web Services (AWS) Simple Notification Service (SNS)
A common feature among most websites is a way to contact the owner for any comments or feedback (or complaints). In previous versions of my website and blog I used several techniques to provide a contact me form. In almost all the cases I had to implement the actual email submission on the website’s hosting server or in some cases used a 3rd party service that provided me this functionality by querying an HTTP endpoint they gave me with the actual message and they sent the email for me, to me.
Today I decided to roll out my own contact-form service using AWS. As it turns out, it is amazingly easy to setup and it only takes you 15 minutes from the moment you sign up for the free-tier account to the point where you have an active form sending you emails. Awesome time we live in!
Assumptions
- You have an active AWS account (if not do yourself a favor and register for the 1-year free tier at AWS).
- You have a website somewhere or you know how to use Simple Storage Service (S3) from AWS to host your website files.
Services
In order to implement the contact form we are gong to use two services from AWS.
Simple Notification Service (SNS) (SNS service) Amazon SNS is a fast, flexible, fully managed pub-sub messaging service. Use it as a cloud-based mobile app notification service to send push notifications, email, and SMS messages; or as an enterprise-messaging infrastructure. (description as per AWS documentation)
Amazon Cognito (Cognito service) Amazon Cognito gives you unique identifiers for your end users and then lets you securely store and sync user app data in the AWS Cloud across multiple devices and OS platforms. You can do this with just a few lines of code, and your app can work the same, regardless of whether a user’s devices are online or offline. When new data is available in the sync store, a user’s devices can be alerted by a silent push notification so that your app can sync the new data automatically. (description as per AWS documentation)
Procedure
The whole procedure is very simple. We will create an SNS topic (imagine it as an endpoint) where the website will send the message of the contact form. As soon as SNS receives the message it will automatically send it over to our email, which we will have configured through the AWS console to be a subscriber of that specific topic. Amazon Cognito is used just as a way to get temporary credentials for the website in order to be able to publish the message to the SNS topic.
I will explain the implementation in three steps, a) Amazon Cognito, b) SNS and c) Securing our SNS topic to allow only publishings from our website domain.
Amazon Cognito
We use Cognito just for the sake of getting temporary credentials for our website in order to be able to use any AWS service through the Javascript SDK.
Login to the AWS console and open the Amazon Cognito service (direct link)
Select Create new identity pool

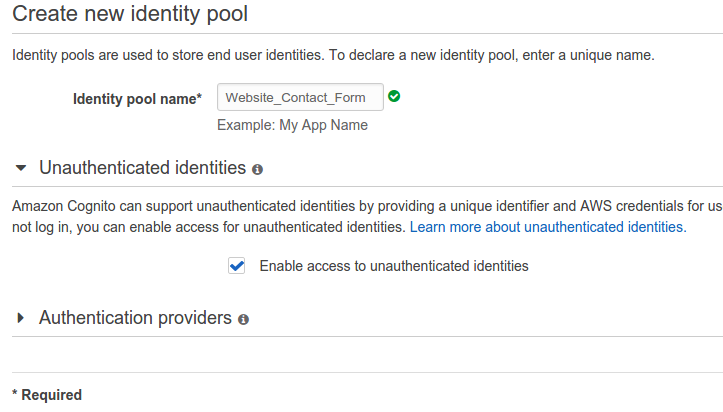
Type in a name for your pool (i.e. Website_Contact_Form) and enable Unauthenticated identities.
You should have something along the lines of the following picture.
Click Create Pool and then on the next page you get the message “Your Cognito identities require access to your resources”. Just click Allow (bottom right) to proceed.
You should be in the Edit identity pool page now where you see the information you provided above. From the left side menu choose Sample code and in the Platform dropdown select Javascript.
Download the AWS SDK since you will use it on your website later.
You can use the code provided to get temporary credentials for the newly created identity pool. In my case the code is similar to what is shown below.
// Initialize the Amazon Cognito credentials provider
AWS.config.region = 'eu-west-1'; // Region
AWS.config.credentials = new AWS.CognitoIdentityCredentials({
    IdentityPoolId: 'eu-west-1:e4c24108-5050-42f8-ac0b-761c46aa947f',
});
That’s it for the Cognito service!
Simple Notification Service (SNS)
SNS is a bit longer procedure but nothing complex. The philosophy behind SNS is that you have a topic (endpoint) with some publishers and some subscribers. When a publisher posts something to that topic then all the subscribers are notified automatically by the service with the newly published message. I guess by now you should have figured out that the subscriber to our SNS topic will be our email and the publisher of the topic will be our website.
Let’s dive in!
Login to the AWS console and open the SNS service (direct link)
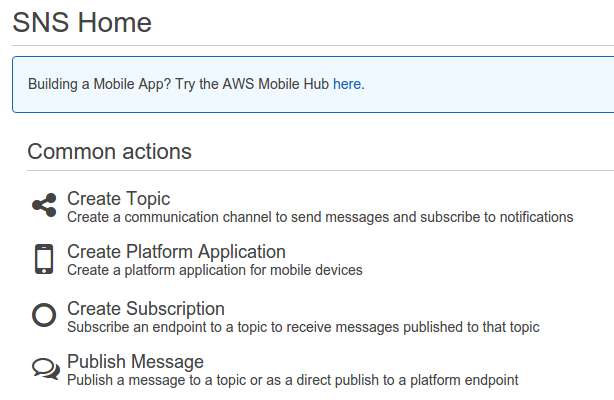
Select Create Topic and then just fill out the Topic name with whatever you want (i.e. com-website-contact-form). You should now see the Topic Details page for your new topic (similar to the picture below).
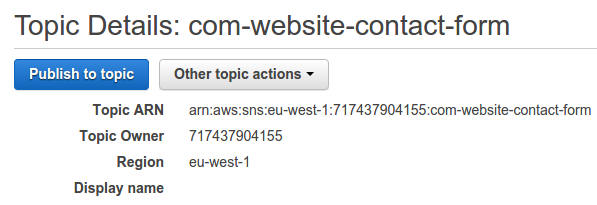
Click on the dropdown Other topic actions and select Edit topic policy.
From the Edit topic policy screen make sure you are in the Basic View and modify the options as per the picture below and click Update. Basically we allow everyone to become publisher of the topic but only we (the owner) can subscribe to it.

Now you successfully have a topic that anyone can publish messages to.
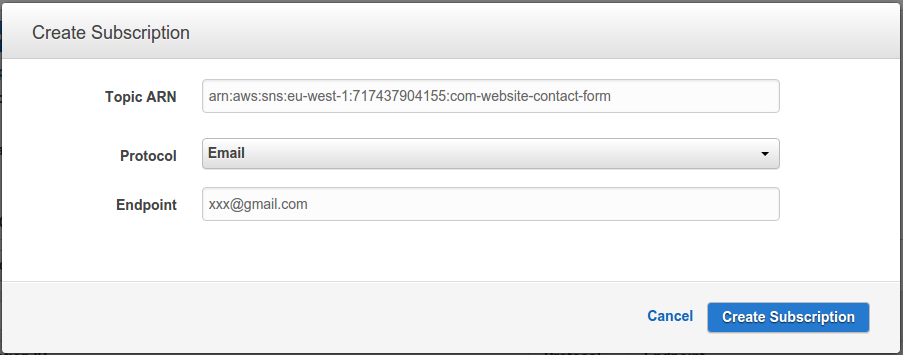
Time to add our email as a subscriber to the topic. From the Topic Details page, click on the Create Subscription button.
Make sure to change the Protocol to Email and fill out your email on the corresponding box and click Create Subscription. An email will be sent to your email in order for you to confirm that you would like to subscribe to this topic.
Perfect, we are almost there!
Code
Here I will provide the very minimal code required to publish a message from your website. I will not include any styling or validation or anything since the scope of the article is just to connect the different AWS services together.
Below you can find the whole HTML and Javascript code used to send a message to your email from the website.
<html>
<head>
    <script src="aws-sdk/dist/aws-sdk.min.js"></script>
    <script type="text/javascript">
        var LPAWS = {};

        // Initialize the Amazon Cognito credentials provider
        AWS.config.region = 'eu-west-1'; // Region
        AWS.config.credentials = new AWS.CognitoIdentityCredentials({
            IdentityPoolId: 'eu-west-1:e4c24108-5050-42f8-ac0b-761c46aa947f',
        });

        LPAWS.sendToTopic = function() {
            var sns = new AWS.SNS();
            var params = {
                //Message: 'Hello topic', /* required */
                Message: document.querySelector('#input-msg').value,
                Subject: 'Browser SNS publish - contact form',
                TopicArn: 'arn:aws:sns:eu-west-1:717437904155:com-website-contact-form'
            };
            sns.publish(params, function(err, data) {
                if (err) console.log(err, err.stack); // an error occurred
                else     console.log(data);           // successful response
            });
        };
    </script>
</head>
<body>
    <form>
        <input type="text" name="msg" id="input-msg"/>
        <button onclick="LPAWS.sendToTopic(); return false;">Send to SNS topic</button>
    </form>
</body>
</html>
I deployed locally the above code and as you can see from the screenshot below it works perfectly! Good for us!

Secure our SNS topic
The only issue we have right now is that anyone can publish messages to the SNS topic. Therefore we could receive a lot of spamming if someone inspected our Javascript code and extracted the endpoints for the SNS topic and Cognito identity pool.
The solution to this problem is to add a policy rule in our SNS topic to only allow our website to act as a publisher, which is trivial.
Login to the SNS console (direct link)
From the left side menu select Topics
From the list of topics select the one we created before, then click at Actions and from the dropdown select Edit topic policy.
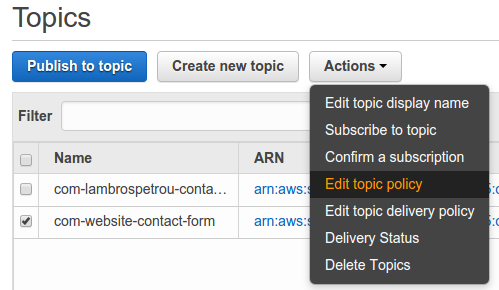
Now instead of the Basic View you should go to the Advanced View
In Advanced View you can directly edit the topic policy rules in detail. We want to restrict access for publishing only to our domain. Make sure that the second statement of the rules is as the following excerpt.
{
  "Sid": "__console_pub_0",
  "Effect": "Allow",
  "Principal": {
    "AWS": "*"
  },
  "Action": "SNS:Publish",
  "Resource": "arn:aws:sns:eu-west-1:717437904155:com-website-contact-form",
  "Condition": {
    "StringLike": {
      "aws:Referer": [
        "https://www.lambrospetrou.com/*",
        "https://lambrospetrou.com/*"
      ]
    }
  }
}
The above configuration adds the Condition to the existing rule which is what is restricting access to the Publish permissions of the topic only to our domain. Make sure that you use your own Resource arn url which can be found in the topics details page and also your own domains.
Done. Your website is the only one with rights to publish messages into your SNS topic (except of course yourself through the console). Please be advised though that it is not difficult for programmers to create TCP packets with the proper headers to fool this policy. At least we make it a bit harder for the usual user :)
Conclusion
In conclusion, we have seen how easy it is with Simple Notification Service (SNS) and Amazon Cognito services to create our own mailing system. You can extend this configuration to send SMS, Push notifications to your devices or anything else you can imagine just by playing with the different SNS subscription types.
There are many features built into SNS that you can use in order to make your messages more advanced and more powerful. You can read all about them in the AWS SNS documentation.
If you spot any errors in the tutorial or your experience is different from what is described here please don’t hesitate to contact me.
Disclaimer
The details used above for the SNS topic and Cognito identity pool were deleted after completing this tutorial.